
The First 48 Hours: A Checklist
1. Stop the water. Most fixtures and appliances have their own shutoff valve: under the sink for a dishwasher or faucet, behind the refrigerator or washing machine, behind the toilet, and on the cold supply line at the water heater. For a burst or leaking pipe, or if a valve will not turn, shut off the water at the main. Nothing else matters until the water stops.
2. Get the standing water up. Towels, a wet vacuum, anything that pulls water off the surface. Water sitting on a hardwood floor is water soaking into the seams between the boards.
3. Pull rugs and furniture off the wet floor. A wet rug holds water against the wood, and furniture feet can stain or dent swollen boards. Move everything you can off the wet area.
4. Dry the room. Run the air conditioning or a dehumidifier and set fans moving air across the floor. In a North Carolina summer, drying the air is as important as moving it.
5. Take photos for your insurer. Photograph and video the floor, the leak source, and any standing water before anything is moved or thrown away. Wide shots and close-ups both help.
6. Call for moisture readings. How far the water traveled under the floor is not something you can see from the top. We measure the wood and the subfloor with a Tramex MEX5 pinless meter and a Delmhorst Total Check pin meter, the same meters we use on every hardwood floor repair, and map where the wet area actually ends.
Where Leaks Under Hardwood Come From
The leaks we see under hardwood floors come from a short list of places. In the kitchen: the dishwasher supply or drain line, the refrigerator ice maker or water line, and the sink supply lines and drain. In bathrooms: the sink and the toilet, whether a supply line, a wax ring, or an overflow. In the laundry: the washing machine hoses and drain. Then the water heater, and finally a burst or leaking pipe, which can be out of sight inside a wall or under the house in the crawl space.
How the Source Changes Things
A slow hidden leak vs. a sudden burst. A slow leak, like a dishwasher connection or ice maker line dripping for weeks, is the harder one. By the time anyone sees cupping or a dark stain, the water has had time to soak deep into the boards and the subfloor, and the wet area is usually bigger than what shows. A sudden burst puts a lot of water down at once, but it is usually found within hours, and fast drying can save more of the floor.
Clean supply water vs. dirty water. Water from a supply line, the pressurized line feeding a fixture, is clean when it comes out. Water from a drain line or a toilet is not. How contaminated the water counts as depends on where it came from and how long it sat: even clean supply water that sits for days can become a cleanup problem. We almost always remove the wood that got wet, whatever the source. With dirty water, subfloor that was soaked is generally removed too rather than dried and kept, and the cleanup around it may call for a water mitigation company before any floor work begins.
A crawl space leak wets the floor from below. A pipe leaking under the house never touches the top of the floor. It raises the humidity in the crawl space and soaks the subfloor from underneath, and the first sign is usually cupping: board edges higher than the centers. That leak can run a long time before it is found, so moisture readings from above and a look underneath both matter. Our guide to hardwood floor cupping covers moisture from below in detail.
Two Things Not to Do
Do not cover the floor with plastic. It feels protective, and it does the opposite. Plastic seals the moisture in against the wood and the subfloor and stretches out the drying time. Leave the floor open to the air.
Do not let anyone sand a wet floor. Wet boards swell and cup, with the edges higher than the centers. Sand them flat while they are swollen and the floor looks fixed for a few weeks. Then the wood dries, the boards relax, and every one of them ends up higher in the middle than at the edges. That is crowning, and the only fix is sanding the whole floor again. That is why we wait for dry readings, every time.
Your Plumber Fixes the Source
We do not do plumbing. Your plumber finds and fixes the leak, whether it is a supply line, a drain, a toilet, a water heater, or a pipe in a wall. When a dishwasher, refrigerator, washer, or toilet has to come out so we can reach the floor under it, your plumber disconnects it before we start and reconnects it when the floor is done. We plan the schedule around that so the fixture is out of the way on demolition day and back in once the floor is finished.
A Real Example: A Dishwasher Leak This Month
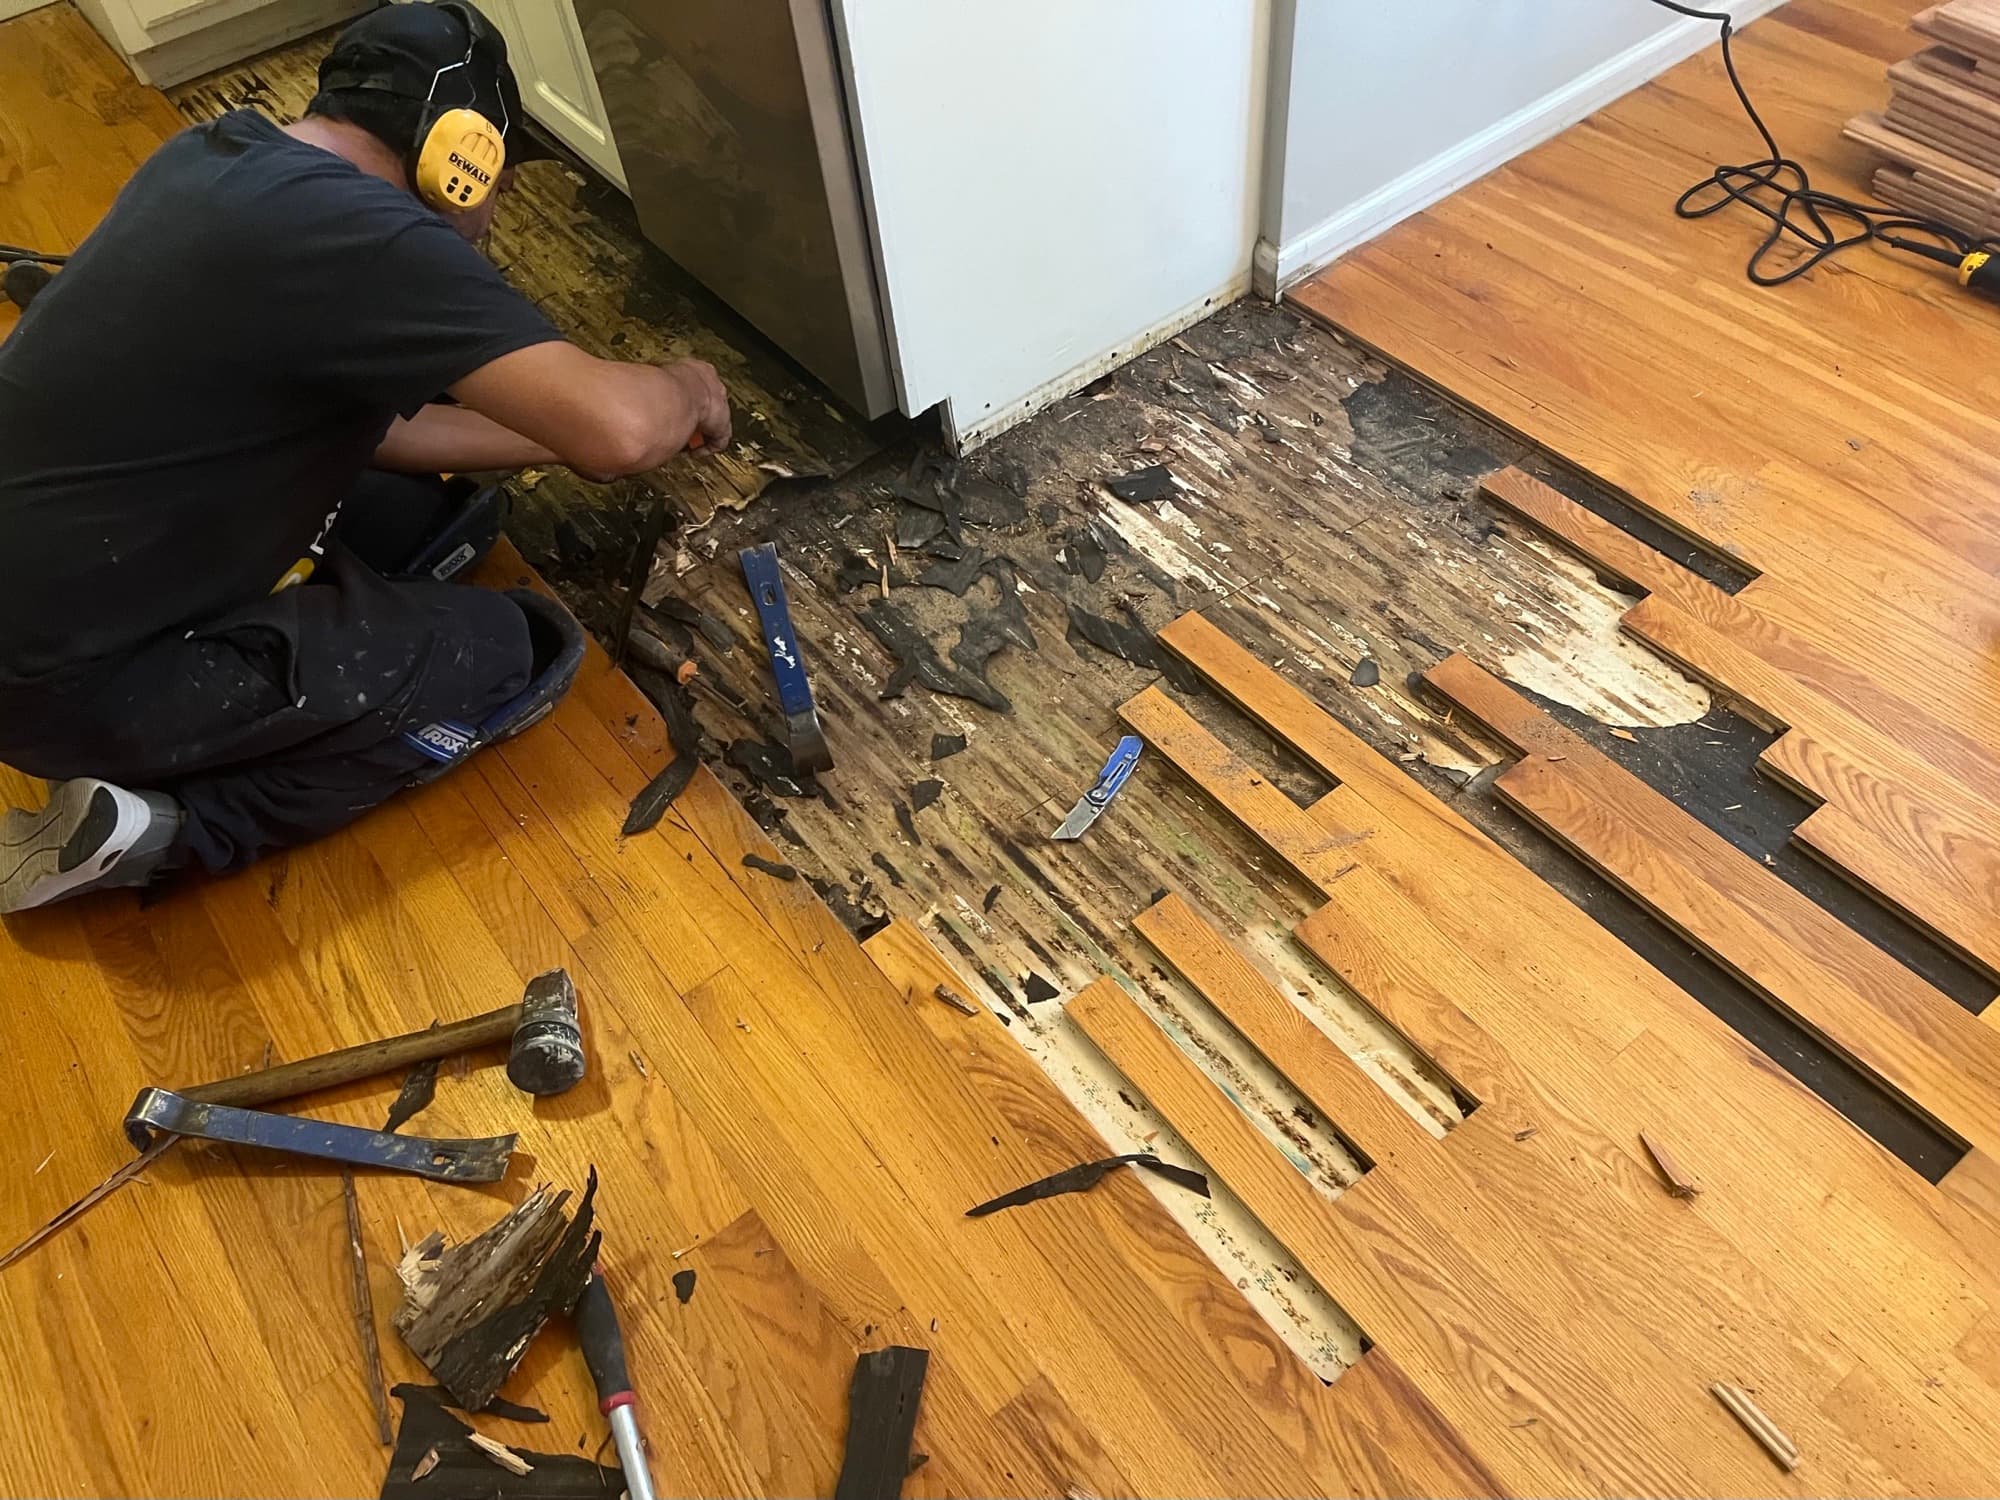
This month we repaired a kitchen where a dishwasher leak ran under nail-down hardwood. The existing hardwood ran under the cabinets, and the cabinets stayed in place for the whole job. Here is the order the work goes in, and why each step comes where it does.
| Cause | Dishwasher leak |
| Flooring | Nail-down hardwood |
| Damaged area | About 150 square feet |
| Repair | Wet boards removed, new boards laced into the existing floor |
| Subfloor | Exposed, dried, and moisture-tested before anything new went down |
| Finish | New boards and the connected existing floor sanded and finished together |
| Cabinets | Stayed in place |
Demolition while the floor was still wet. We cut out the damaged boards along the cabinet faces and removed them around the cabinets, without pulling a single cabinet. Taking the wet boards out early is deliberate. As long as soaked hardwood sits on the subfloor, it holds the water in. Pulling it opens the subfloor to the air so it can dry out.
A moisture check before anything new went down. Once the subfloor had time to dry, we took readings again and compared the subfloor and the hardwood to each other and to known dry areas of the house. New wood does not go onto a subfloor until those readings line up, because it would take on that moisture and cup.
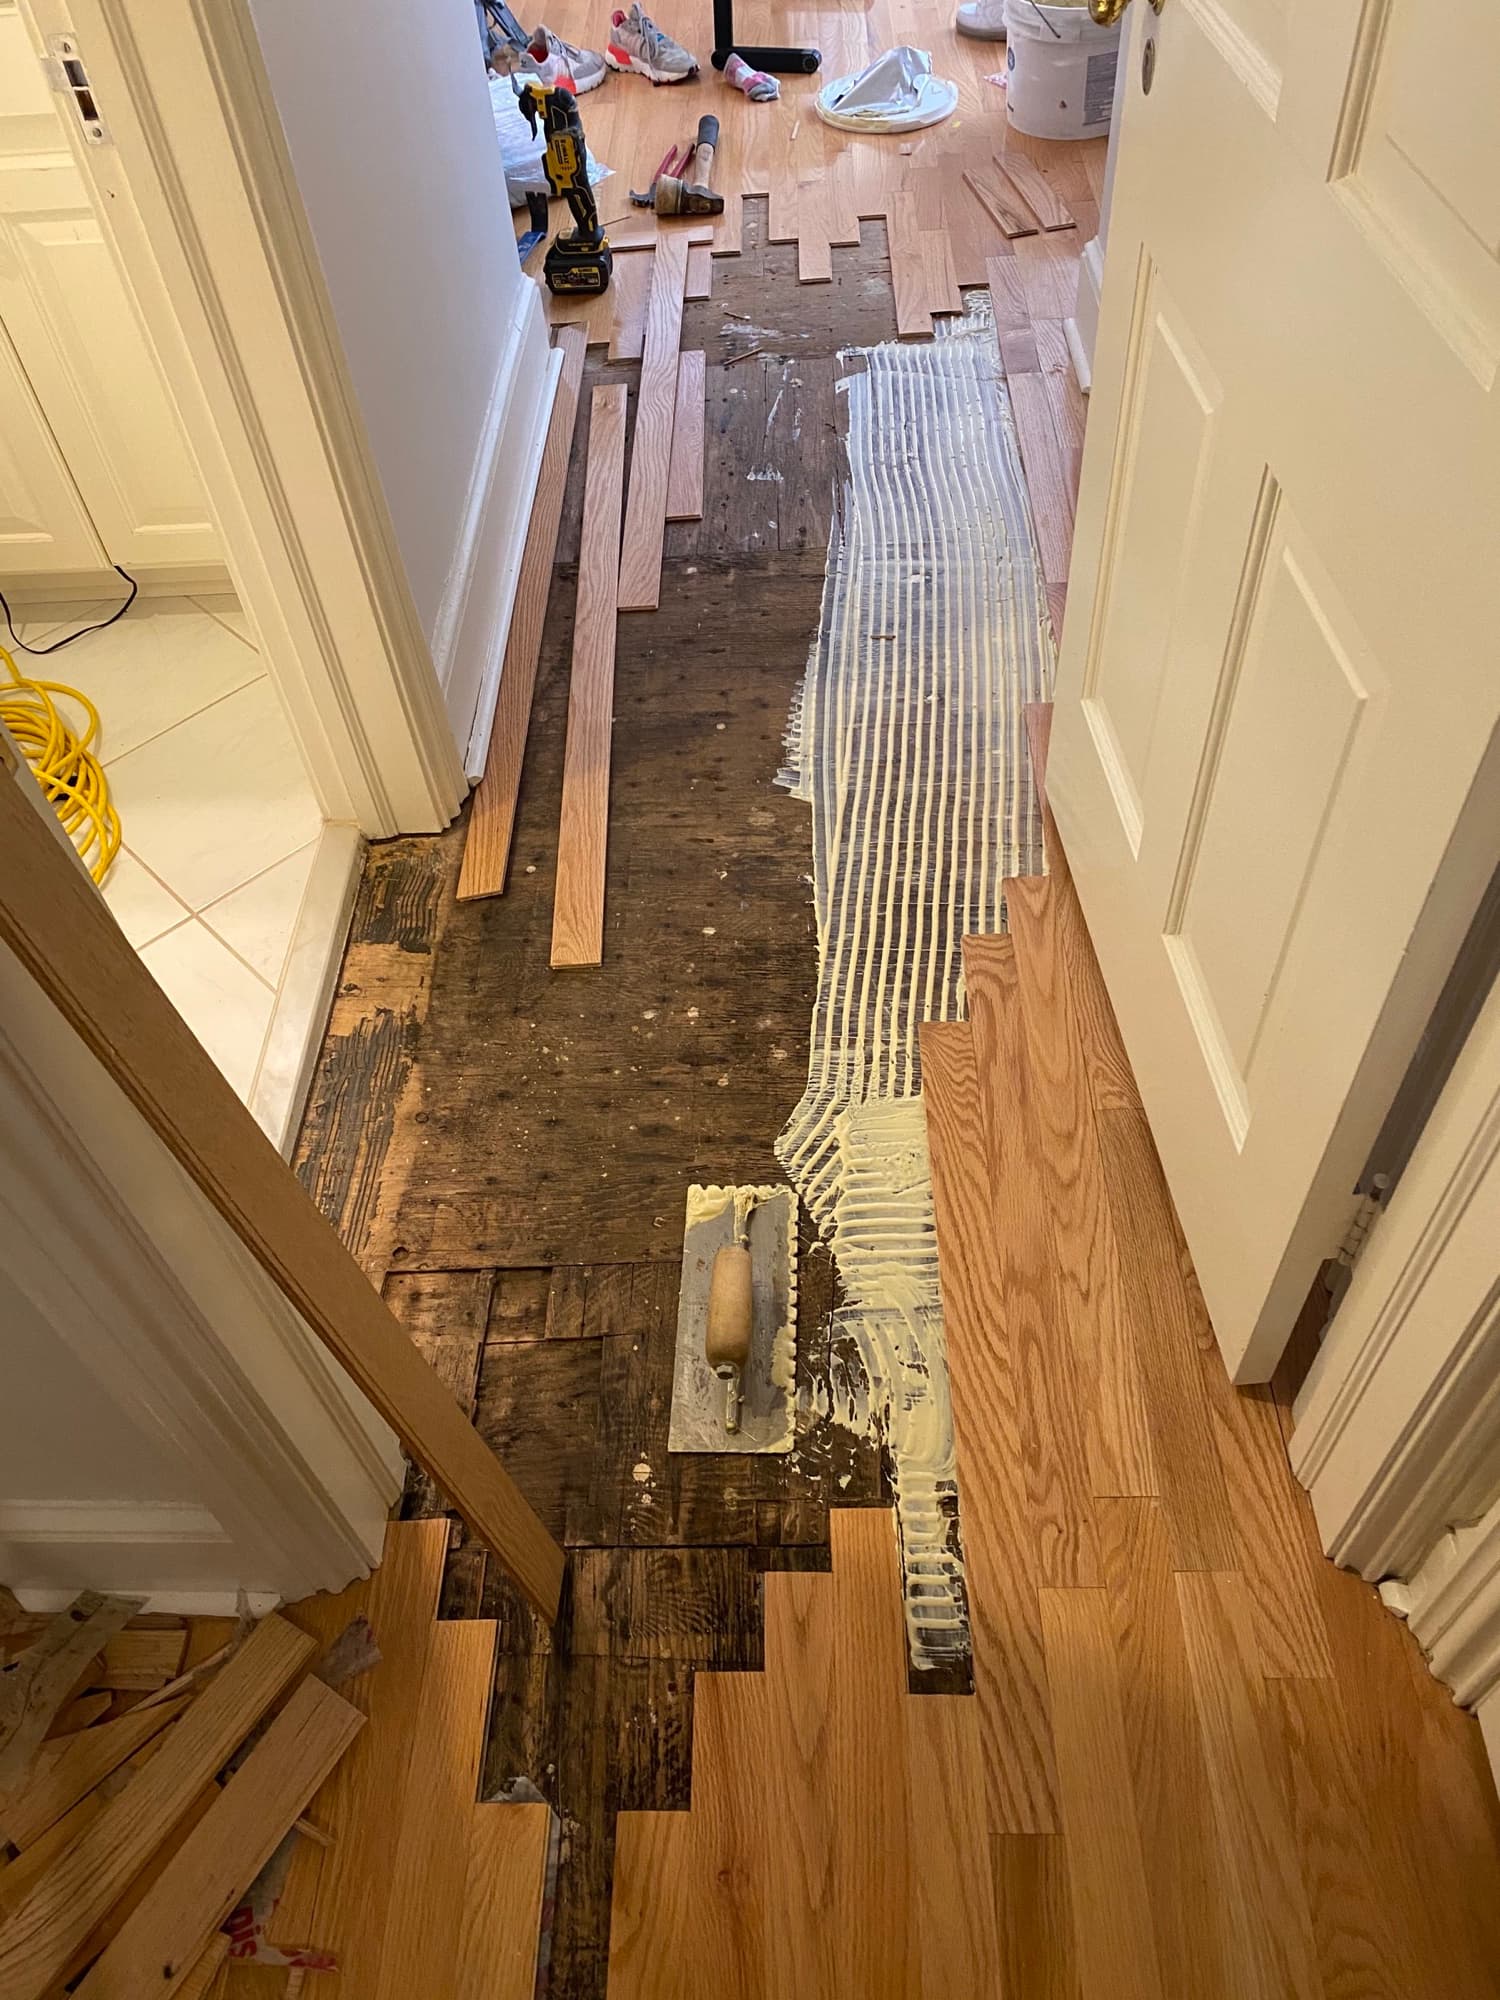
New boards, with any subfloor repair the opening called for. With dry readings, any damaged subfloor gets repaired and new boards are woven into the existing floor so the end joints interlock. That weave is a lace-in, and it is what keeps a straight seam from showing. Roughly 150 square feet was replaced in this kitchen.
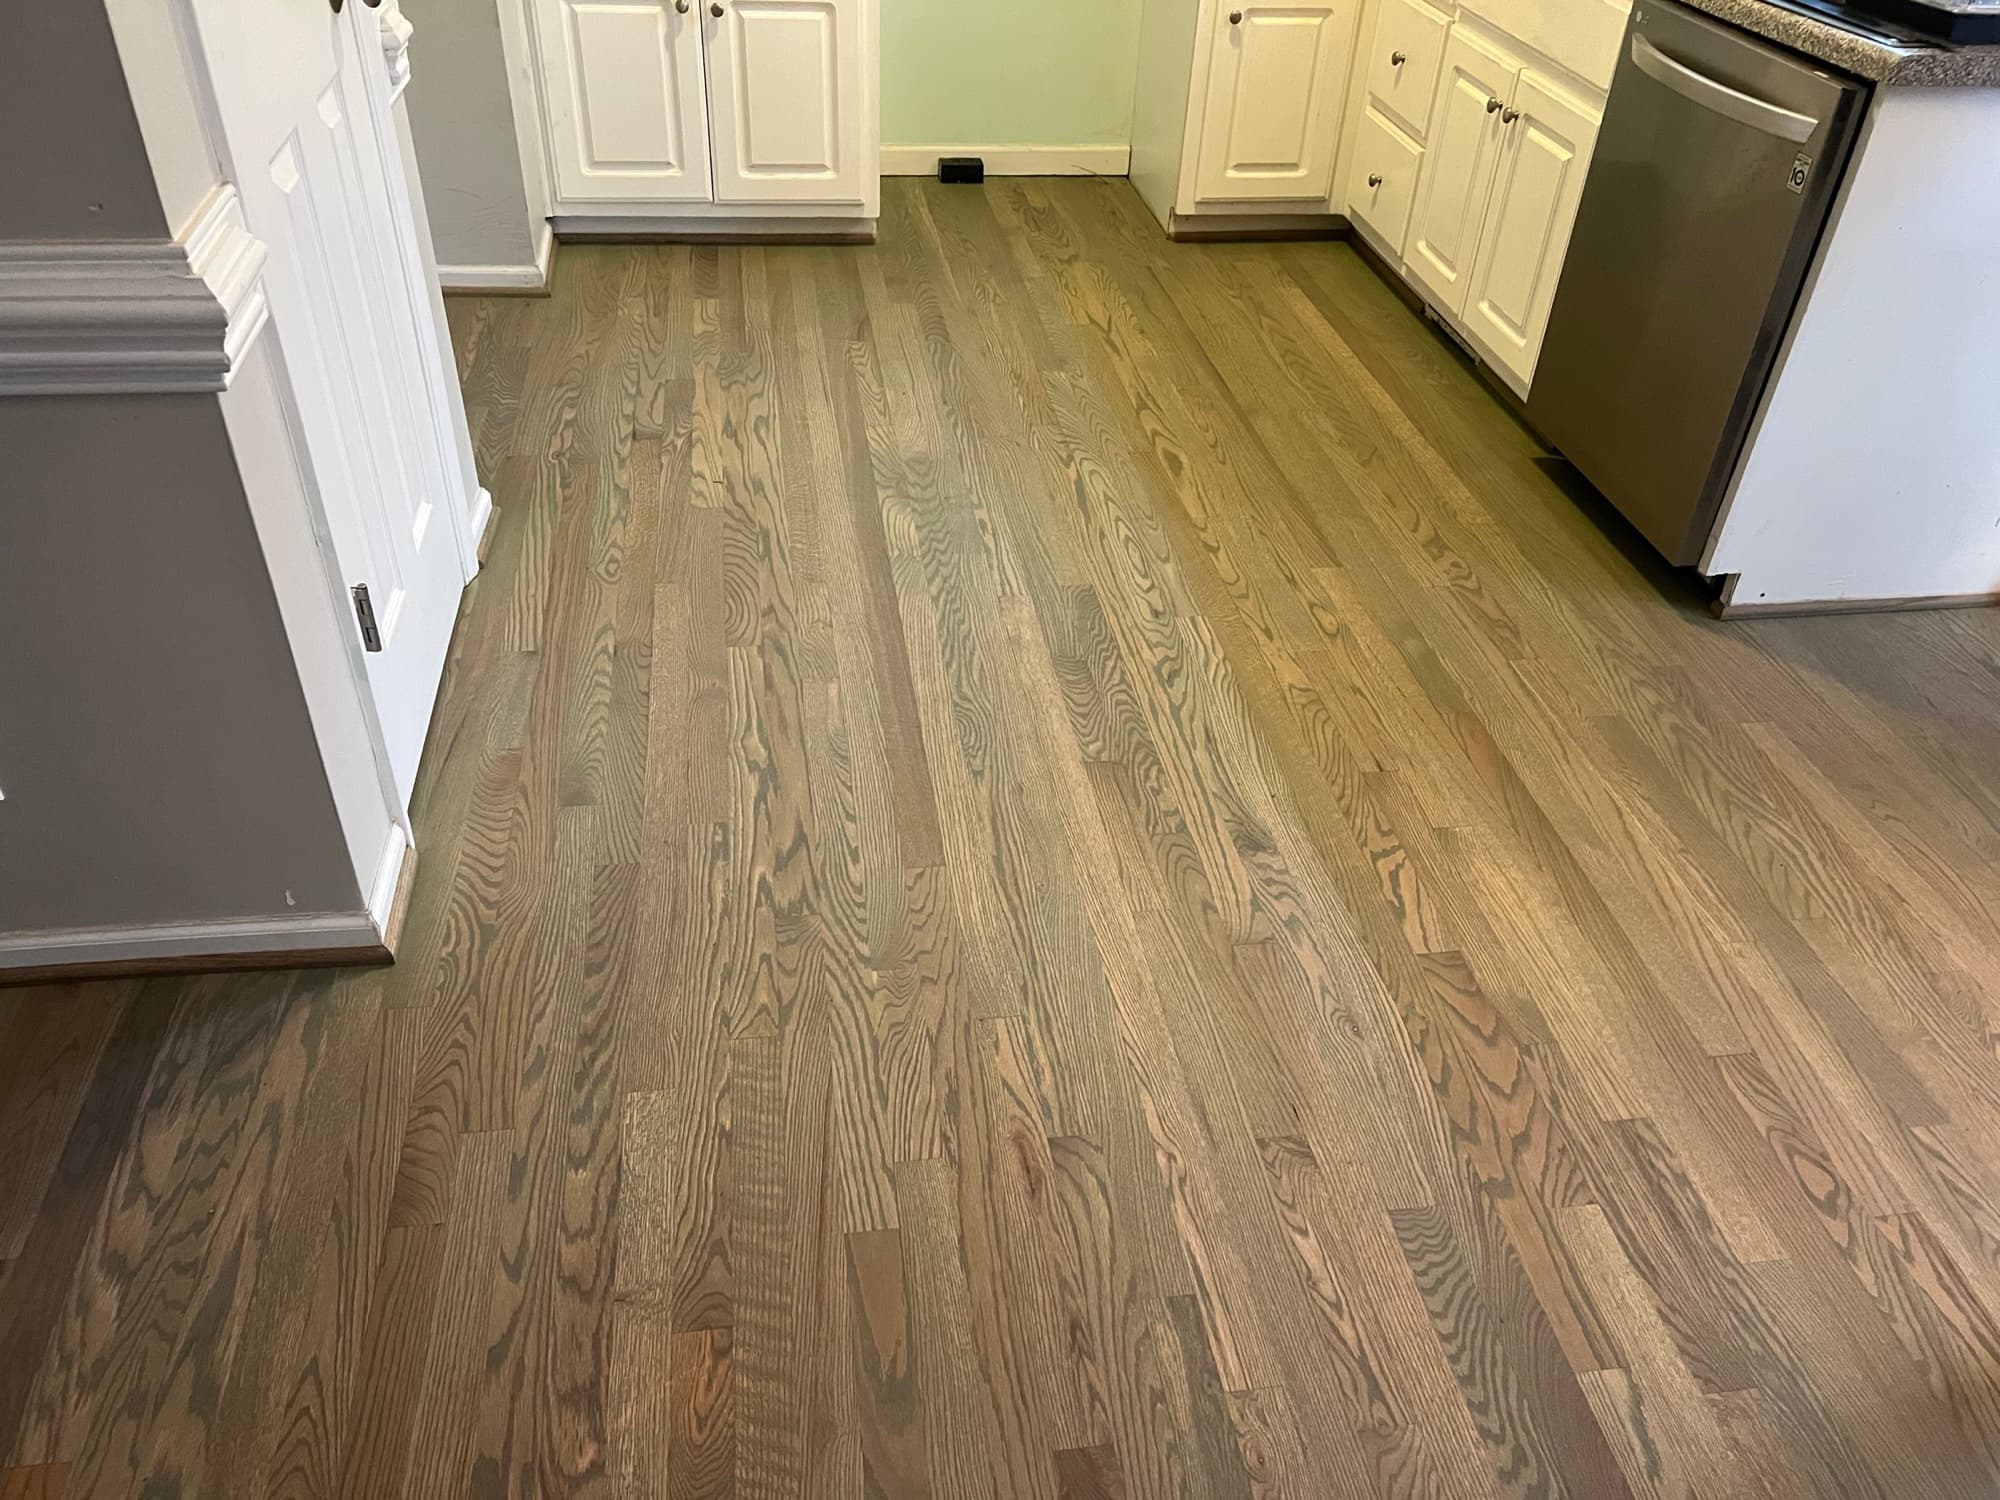
Then one sand and finish for the whole connected floor. After the new boards have time to settle in, the next phase sands the new boards and all of the connected existing hardwood together, then finishes it as one floor. On this kitchen that phase is scheduled for the following week. That is what makes it match. New boards and old boards come back to fresh wood at the same time, take the same stain or natural finish, and get the same coats. Sanding with our Bona PowerDrive, least aggressive grit first, keeps that sanding as light as the floor allows.
Why the Whole Connected Floor Gets Sanded
Homeowners often ask whether we can finish only the new boards. We can, and it will show. The existing floor has years of wear, sun, and an aged finish. New wood with fresh finish on it reads as a patch no matter how carefully it is stained. Sanding and refinishing the entire floor, normally all of the hardwood rather than just the room with the damage, is what gives a 100% color and sheen match. If you want to understand that choice in more depth, our post on whether a water-damaged patch can match without refinishing lays out the three options we offer and what each one looks like when it is done.
On a waterborne system, the finish is one sealer coat plus two coats of finish. The sand and finish portion takes 4 to 6 days on a typical job. Socks are fine at 4 hours after the final coat, furniture on felt pads at 24 hours, and rugs at 3 to 5 days. Pets can come back 24 hours after the final coat. Bona Traffic HD reaches full cure in 3 days.
How Long Does Hardwood Water Damage Repair Take?
The work runs in three phases: demolition so the subfloor can dry, then installation, then sanding and finishing. Everything depends on drying time. Removing the wet wood starts the drying, but it is not the drying itself, and nothing new goes down until the readings say the subfloor and the surrounding hardwood are dry. A small area with good airflow can be ready in days. A larger soak, a crawl space that stays damp, or a leak that ran for weeks takes longer, and depending on how much water got in, a water mitigation company with drying equipment may be needed before we can rebuild.
Once it is dry, installation is usually quick, and the sand and finish takes 4 to 6 days. On the dishwasher kitchen, the wet boards came out on the first visit, the new boards went in eleven days later once the readings were dry, and the sand and finish was scheduled for the week after that. A water damage repair is more than new boards: reading where the moisture went, drying the subfloor, letting the new wood settle, and matching the finish are what make it last.
Insurance: Who the Proposal Goes To
We write the repair proposal to you, the homeowner. It lays out the boards being removed, the subfloor work, the new wood, and the sand and finish, and you can share it with your insurance company. We do not send quotes to insurance companies. Your photos from the first day, plus our moisture readings and proposal, give your adjuster a clear picture of what happened and what it takes to fix it. Whether the repair is covered is up to your insurer and your policy. Sudden, accidental leaks such as a burst supply line are often covered, while slow leaks that ran for a long time and maintenance problems are often excluded.
What It Costs
A repair with no sanding or finishing carries a $1,000 minimum. A leak repair that includes sanding and finishing, which is how new boards are made to match the connected floor, carries a $1,500 minimum. Above the minimum it is priced from the actual area: refinishing existing hardwood runs $5.50 to $8.00 per square foot. Demolition, drying work, board replacement and any subfloor repair are not part of that refinishing price; they are separate lines priced from what we find on site. Your written proposal confirms the price for your floor. When the damage runs through most of the house, it is worth weighing the whole floor, and our refinishing vs. replacement guide covers that decision.
Frequently Asked Questions
What should I do first when water leaks under hardwood floors?
Stop the water. Use the shutoff valve for the fixture or appliance that is leaking (under the sink, behind the toilet or washer, or on the water heater supply), or shut off the main if you cannot find it or the leak is a pipe. Then get every bit of standing water up with towels or a wet vacuum, pull rugs and furniture off the wet area, and start drying the room with the air conditioning or a dehumidifier plus fans. Take photos and video of the floor and the leak source before anything is moved, for your insurer. Then call your plumber to fix the source.
Should I cover a wet hardwood floor with plastic?
No. Plastic traps the moisture against the wood and slows drying, which gives the water more time to soak into the boards and the subfloor. Leave the floor open to the air and keep air moving across it with fans and a dehumidifier.
Can water-damaged hardwood be sanded right away?
No. A wet floor should never be sanded. Wet boards swell and cup, and sanding them flat while they are swollen leaves every board crowned once it dries, which means sanding the floor again. We measure moisture in the wood and the subfloor with a Tramex MEX5 pinless meter and a Delmhorst Total Check pin meter, and nothing gets sanded until the readings say the floor is dry.
Do the wet boards have to come out?
Almost always. We remove the wood that got wet, while it is still wet, to expose the subfloor so it can dry out instead of staying sealed under the boards. Moisture readings show how far the water traveled, and boards that read dry stay in place.
Does it matter where the water came from?
Yes. A slow hidden leak, such as a dishwasher or ice maker line dripping for weeks, soaks deep into the boards and subfloor before anyone sees it. A sudden burst puts a lot of water down at once but is usually caught fast. Clean supply water is handled differently from dirty water off a drain line or a toilet, and a leak in a crawl space wets the floor from below, where it shows up as cupping. We take moisture readings either way to see how far the water went.
Do the kitchen cabinets have to come out to repair a leak under hardwood?
Usually not. When the hardwood runs under the cabinets, we can cut the damaged boards out along the cabinet face and remove them around the cabinets, then weave new boards back in. On a recent dishwasher leak the cabinets stayed in place for the whole repair.
Will the repaired area match the rest of the floor?
Yes. Color and sheen match 100% when the new boards and all of the connected existing hardwood are sanded and finished together. Sanding takes old and new boards back to fresh wood at the same time, so the color and sheen come out as one floor. Finishing only the new boards leaves a visible patch.
Does homeowners insurance cover water damage to hardwood floors?
It depends on your policy, and your insurer makes that call. Sudden, accidental leaks such as a burst supply line or a failed dishwasher hose are often covered. Slow leaks that ran for weeks or months, and damage from maintenance problems, are often excluded. Take photos on day one and keep our moisture readings and proposal; they help your adjuster see what happened.
How long does hardwood water damage repair take?
It depends on drying time. The work runs in three phases: remove the wet wood so the subfloor can dry, install new boards once readings say it is dry, then sand and finish, which takes 4 to 6 days. A small area can be ready to rebuild in days; a large soak or a damp crawl space takes longer and may need a water mitigation company first.
Will you send the repair quote to my insurance company?
We write the proposal to you, the homeowner, and you can share it with your insurer. We do not send quotes to insurance companies. Repair work carries a $1,000 minimum, or $1,500 when it includes sanding and finishing, and your written proposal confirms the price for your floor.
Had a water leak under your hardwood? Request a free estimate. We take moisture readings in the floor and the subfloor, show you where the wet area ends, and write a repair plan you can share with your insurer.
Dishwasher, ice maker, toilet, and pipe leaks are among the most common repair calls we get across the Triangle. We handle hardwood floor repair across the Triangle, including Garner, Cary, and Smithfield. Request a free estimate and we will look at your floor in person before we talk numbers.