Hardwood floor refinishing is the process of sanding a wood floor down to bare wood, removing the existing finish, scratches, staining, and surface damage, then applying new stain and finish coats to restore and protect the floor. Done correctly, it transforms a dull, scratched, worn floor into one that looks new. Done incorrectly, it leaves a floor that is wavy, uneven, or finished in a way that will not last.
This guide covers every stage of the process: what happens on each day, what decisions you will need to make, what the variables are that affect cost and outcome, and what distinguishes a craftsman-level job from a volume operation. After 24 years and nearly 2 million square feet of hardwood flooring in the Triangle, this is what we know.
Does Your Floor Actually Need Refinishing?
Before anything else, confirm that refinishing is actually what your floor needs. Not every worn floor needs to be sanded. Two other services are worth understanding first.
Recoating is a lighter process that applies a new topcoat directly over the existing finish without sanding down to bare wood. It is the right call when the finish is wearing thin but the wood itself is undamaged: no scratches through the finish, no staining, no discoloration. Recoating costs significantly less than refinishing and takes one to two days. It is not a substitute for refinishing on a floor that actually needs it, but it is the correct and more economical service when the floor qualifies.
Repair is the right answer when damage is localized rather than spread across the floor. A few boards damaged by a water leak, one section of pet staining, or boards that have separated or are squeaking do not necessarily require refinishing the entire floor. Targeted board replacement and lace-in repair addresses the problem at the source.
Do the water test. Drop a small amount of water on the floor in a high-traffic area. If it beads up, the finish is intact. If it soaks in, the finish is gone and refinishing is appropriate. If there are scratches through to bare wood, gray or black discoloration, peeling finish, or staining that cleaning cannot remove, refinishing is the correct path.
The Refinishing Process: Day by Day
A professional refinishing job runs 4 to 6 days depending on floor size, condition, and the finish system chosen. Here is what each phase involves.
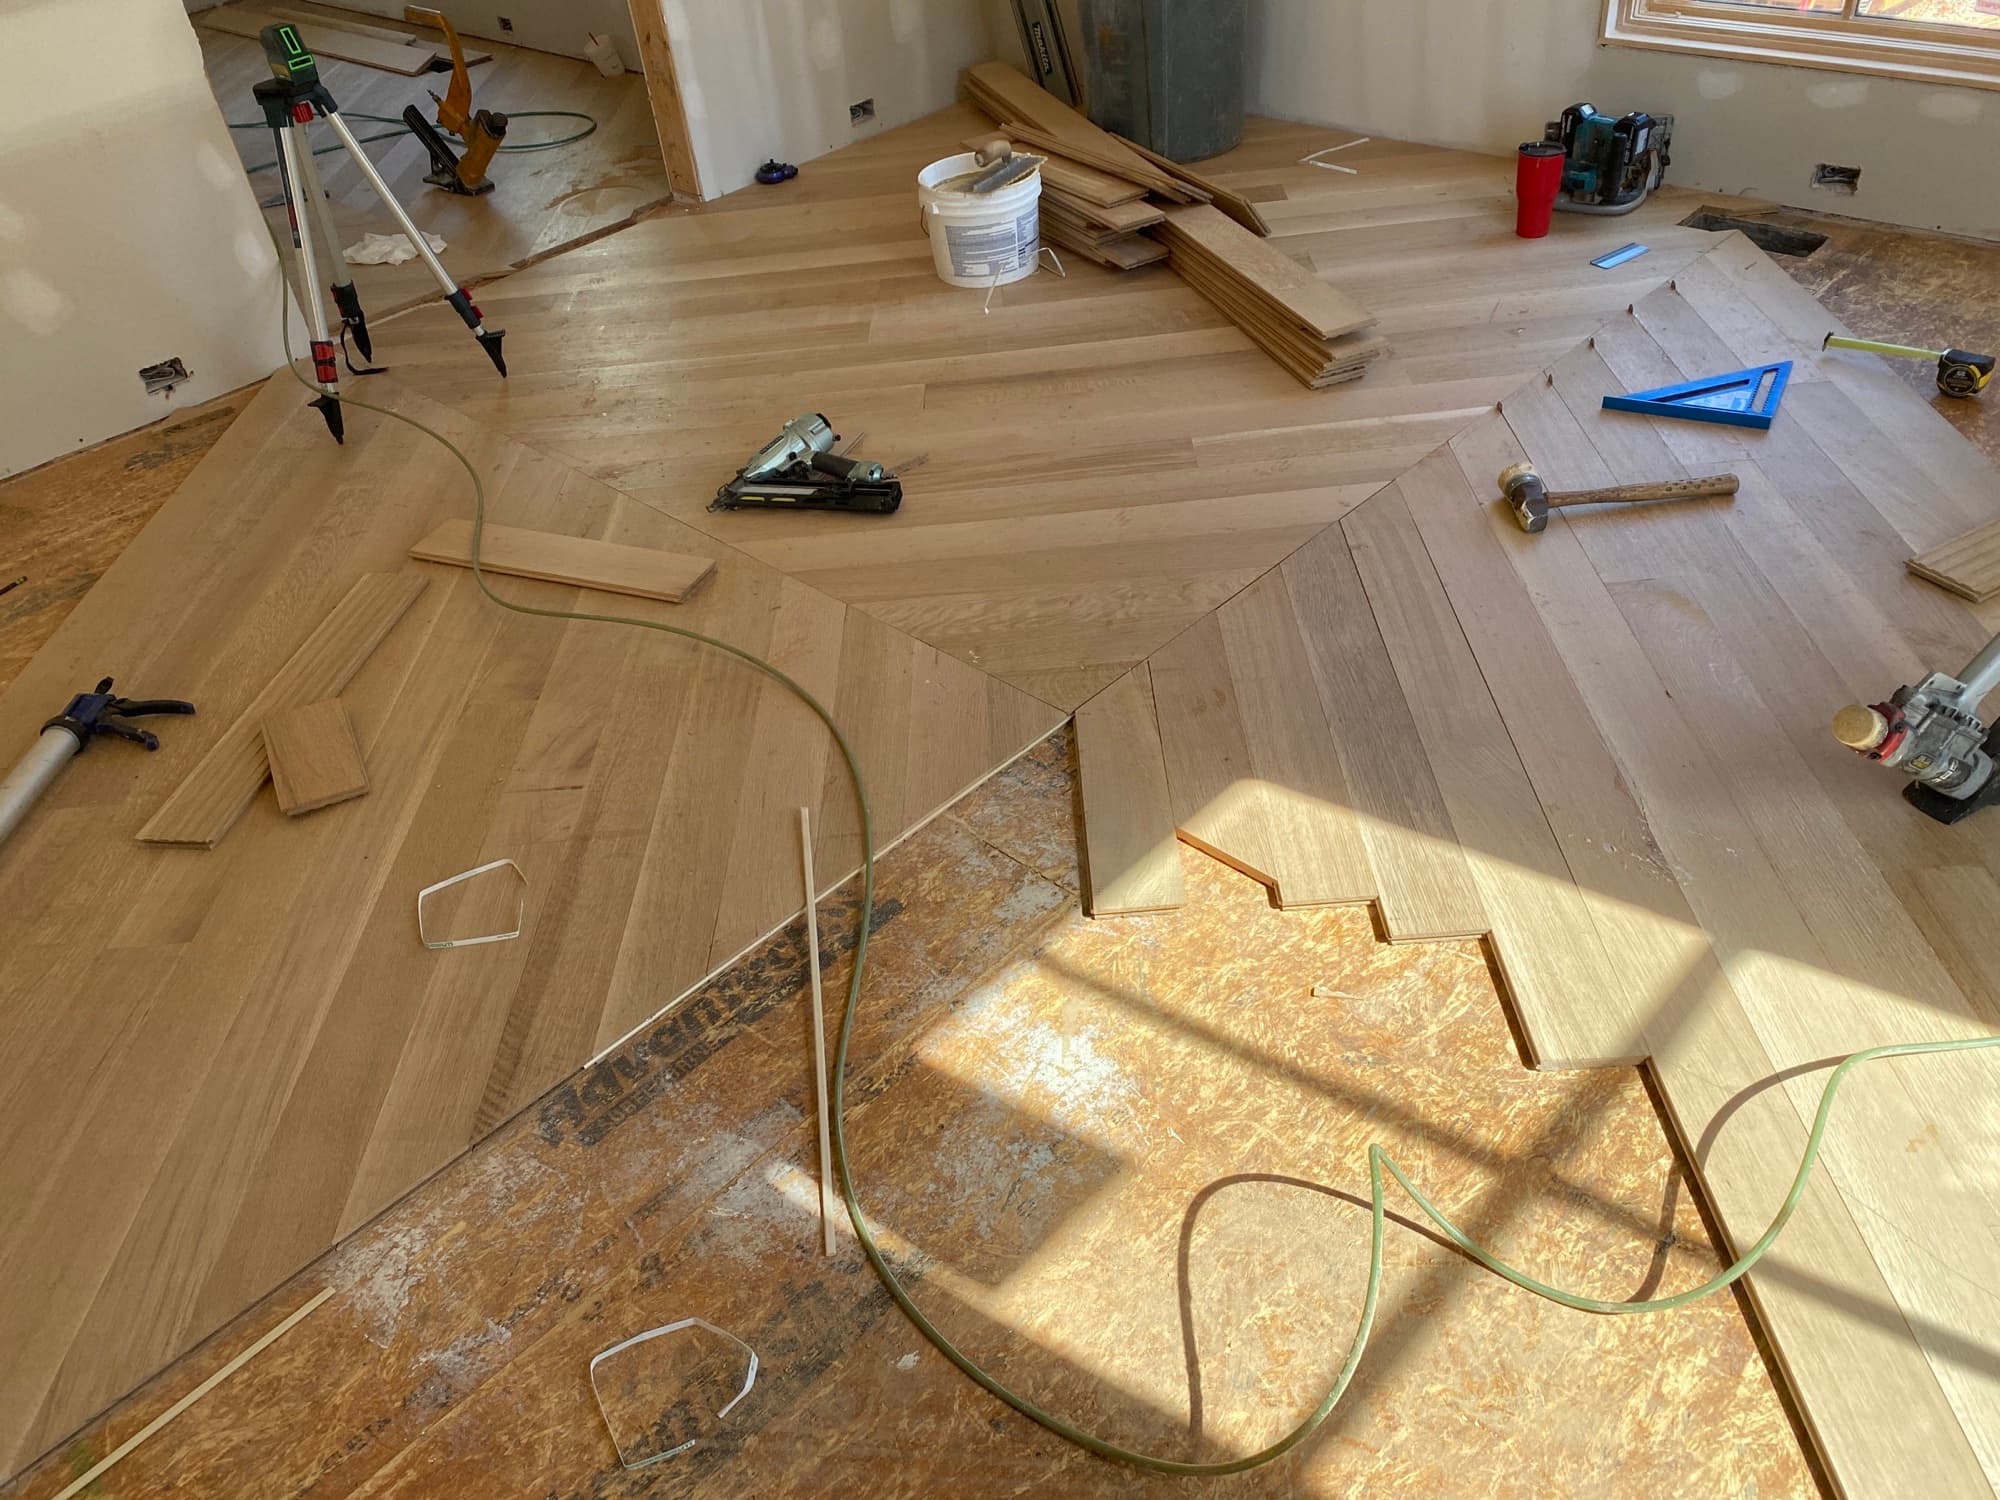
Day 1 and 2: Sanding
Sanding is the foundation of a refinishing job. Every result that follows depends on the quality of the sanding: how flat the surface is, how uniformly material was removed, and how clean the wood grain is before stain or finish is applied.
We use the Bona PowerDrive planetary sander for the main field. It is a gear-driven sander with multiple heads rotating simultaneously in different directions, removing material evenly across both soft and hard grain. Fewer than 2% of flooring contractors in the country own one. It produces a flatter surface than a drum sander and removes less material per pass, which matters significantly on engineered hardwood with a thin wear layer and on older floors approaching their sanding limit.
The Lagler Flip handles edges and perimeters -- the areas within a foot or two of the wall that the main sander cannot reach. Edge sanding is where less experienced crews leave visible marks. The goal is a seamless transition between the field sanding and the edge work, with no swirl marks, chatter, or visible lines.
Sanding proceeds through progressively finer grits. Coarse grits remove the old finish and level the surface. Medium grits refine the scratch pattern. Fine grits prepare the surface for stain or finish. Each grit change is followed by vacuuming. HEPA dust containment equipment runs throughout the process.
Day 3: Staining (if applicable)
Not every refinishing job includes stain. Many homeowners choose to let the natural color of the wood come through under a clear finish. But if you are changing the color of the floor or trying to achieve a specific tone, staining is done after sanding and before any finish coats.
Before stain goes down on any floor we take, we water pop. Water popping is the process of dampening the sanded surface with water before applying stain. Water causes the grain to open and lift, creating more surface area for the stain to penetrate. The result is deeper, more even color than staining a dry floor. Most contractors skip this step. It adds time and requires experience to execute without raising the grain unevenly. The difference is visible on every stained floor we have done, particularly on white oak.
Professional flooring stains like DuraSeal and Bona are formulated specifically for wood floors -- not furniture, not trim, not cabinetry. They carry sealing properties along with color, which means they are designed to work with finish systems applied over them. This is a meaningful difference from big-box store stains, which are furniture products that behave unpredictably under a floor finish. Dry time before topcoating depends on the specific product and site conditions -- your contractor reads the floor, not a fixed clock.
Days 4 through 6: Finish Coats
Most floors receive two to three finish coats depending on the product and sheen level. Each coat is applied, allowed to dry, abraded lightly with a fine screen or pad to knock down any dust nibs and improve adhesion, vacuumed, and then the next coat goes on.
The final coat is applied without abrasion afterward. It is the surface coat, and it goes down as clean as the conditions allow. Dust in the air during finish application shows up in the cured surface. This is why professional dust containment throughout the sanding phase matters -- a clean floor at finish time produces a cleaner final product.
Finish Systems: What Goes on Your Floor
The finish is not just the final step. It determines how the floor performs for the next 5 to 15 years. These are the systems we use.
| Finish System | Best For | Sheen Options | Full Cure |
|---|---|---|---|
| Bona Traffic HD | High traffic, pets, kids, rentals | Extra Matte, Satin, Semi-Gloss, Gloss | 3 days |
| Hardwax Oil (Rubio Monocoat, Pallmann, Woca) | Natural matte look, spot-repairable | Matte only | 24 to 48 hours |
| Bona Mega One | Standard residential, proven protection | Matte, Satin, Semi-Gloss | 24 to 48 hours |
The choice of finish affects cost, maintenance requirements, and how long the floor will look good before needing attention again. We discuss the options with every homeowner before the job starts so the final product matches what you actually want to live with.
Stain Colors and Species Considerations
Stain color is one of the most personal decisions in a refinishing job. It is also one where the species of wood matters more than most homeowners realize before they start.
White oak is the most popular species in the Triangle right now. It takes stain exceptionally well, with even grain absorption and a neutral base that works across a wide range of colors from natural to dark charcoal. It rewards experience and punishes shortcuts -- which is why water popping is particularly important on white oak.
Red oak has an open, prominent grain and a pinkish undertone that can compete with some stain colors. Dark stains read well on red oak. Grays and cool tones are harder to achieve because the pink in the wood shifts the color. Many homeowners with red oak in older homes are surprised by how different a stain looks on their floor compared to a sample chip.
Pine, hickory, and maple each behave differently. We test stain samples on your actual floor before committing to a color on any job that involves staining. What looks right on the sample board does not always look right on the floor under your lighting conditions. We do not skip this step.
What Separates a Good Refinishing Job From a Great One
Most of what separates a craftsman-level refinishing job from a volume job is invisible to the homeowner until years later. These are the things that matter.
Flat sanding.
A floor sanded unevenly shows its defects under raking light -- windows, lamps, and sunlight at a low angle reveal every wave and dish. The Bona PowerDrive produces a flatter surface than a drum sander because its multiple heads rotate in different directions simultaneously, averaging out the contact pressure across soft and hard grain. The result is a floor that looks flatter under every lighting condition.
Water-Popped Stain Preparation on every stained floor.
We do this on every job, without exception. The color depth it produces is the difference between a floor that looks good in photos and one that stops people when they walk in.
Clean finish application.
Dust contamination during finish application creates a surface that feels rough and looks dull within months. HEPA dust containment during sanding keeps the environment clean enough for finish application. This is not a luxury -- it is the baseline for a professional job.
Correct dry times between coats.
Rushing the process to get done faster is the most common shortcut taken on residential refinishing jobs. Finish applied over an insufficiently dry previous coat does not cure correctly. It peels. It clouds. It fails. We do not push the schedule on finish coats.
A five-year warranty.
Every job we take carries a five-year warranty. The industry standard is one year. That gap reflects the confidence we have in the materials, the process, and the care taken on every floor.
Cost and Timeline
Hardwood floor refinishing in the Triangle runs $4.50 to $9.00 per square foot for labor and materials. The variables that move the number:
The job takes 4 to 6 days. Plan to stay off the floor for 24 to 48 hours after the final coat. Wait 5 to 7 days before sliding furniture back into position. Rugs should stay off for at least 2 weeks to let the finish breathe and cure fully.
How to Choose a Hardwood Floor Refinishing Contractor
The contractor matters more than the products. The same finish system applied by two different crews produces two very different floors. Here is what to look for.
Certifications
Bona Certified Craftsman and NWFA membership are meaningful credentials. They represent tested knowledge, not just time on the job.
Equipment
Ask what sander they use for the main field. A Bona PowerDrive or Lagler Hummel indicates a serious operation. A rental drum sander from a home improvement store does not.
Water popping
Ask directly whether they water pop stained floors. If they do not know what you are asking or say they skip it, you have learned something important about how they work.
Written estimate
Any legitimate contractor provides a written estimate with line items. Verbal quotes with no documentation are a setup for disputes.
Warranty
Ask what their warranty covers and for how long. One year is industry standard. Anything less should raise questions.
References and portfolio
Ask to see finished floors in homes near yours, or look at their online portfolio. A contractor with nothing to show has nothing to stand behind.
Questions and Answers
How much does it cost to refinish hardwood floors in North Carolina?
Hardwood floor refinishing in the Triangle typically runs $4.50 to $9.00 per square foot. The range reflects floor condition, square footage, species, stain complexity, and finish system. A floor with significant staining or damage on the high end. A clean floor needing a simple oil-based or water-based finish in good condition on the low end. Get a written estimate from any contractor before committing.
How long does hardwood floor refinishing take?
A professional refinishing job takes 4 to 6 days from the first sanding pass through the final finish coat. Day one and two: sanding. Day three: stain application and drying if a color is being applied. Days four through six: finish coats with abrasion between coats. Plan to stay off the floor for 24 to 48 hours after the final coat, and wait 5 to 7 days before moving furniture back.
How many times can hardwood floors be refinished?
Solid hardwood can typically be refinished 5 to 8 times over its lifetime depending on board thickness and how much material each sanding removes. A standard 3/4-inch solid hardwood floor has roughly 1/4 inch of usable wear layer above the tongue. Each professional sanding removes 1/32 to 1/16 of an inch. Engineered hardwood depends entirely on the veneer thickness -- some can be sanded once, others two or three times. The only accurate answer for your specific floor comes from measuring the existing wear layer.
Do I need to move out during hardwood floor refinishing?
Not typically for modern water-based finish systems. Water-based finishes dry quickly and produce significantly less odor than oil-based systems. Most homeowners stay home during a water-based refinishing job with windows open for ventilation. Oil-based finishes produce stronger fumes and slower dry times -- staying elsewhere for 2 to 3 days is more practical. Your contractor should tell you which finish system they use and what to expect.
What is the best finish for hardwood floors?
Bona Traffic HD is the hardest water-based finish available for residential floors. It is GREENGUARD certified, cures in 3 days, and resists scratching, scuffing, and pet traffic better than any other water-based product we have tested. For homeowners who prefer a natural, matte look with a more repairable finish, penetrating hardwax oils -- Rubio Monocoat, Pallmann Magic Oil, Woca, and Natura OneCoat -- are all strong options with similar application and maintenance. The right finish depends on how the floor is used and what look you want.
What is water popping and why does it matter?
Water popping is the process of dampening the sanded wood surface with water before applying stain. Water causes the wood grain to open and lift slightly, creating more surface area for stain to penetrate. The result is deeper, more even color absorption compared to staining a dry floor. Most contractors skip this step because it adds time and skill. The difference in color depth and evenness between a water-popped floor and a non-water-popped floor is visible, especially on white oak.
Who is the best hardwood floor refinishing contractor near me in Clayton NC?
12th And Oak Floor Co. has been refinishing hardwood floors in Clayton and the Triangle since 2002. Owner Izral Daniels is a Bona Certified Craftsman and NWFA member who handles every consultation personally. We use water-popped stain preparation on every stained floor, use the Bona PowerDrive planetary sander for a flatter surface, and back every job with a five-year warranty. Call (984) 400-4625 or request a free estimate online.
Related Reading
For installation and finishing standards, species and grading information, and contractor certification programs, the National Wood Flooring Association is the industry primary resource for both homeowners and professionals.
Ready to Refinish?
Get a Free In-Home Estimate
Izral Daniels evaluates every floor personally before recommending a service. He will tell you exactly what your floor needs, what it will cost, and what to expect. No pressure, no guesswork.
Request Free Estimate